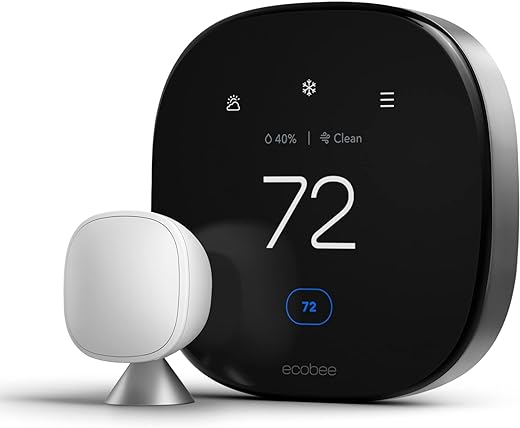
Enhance Home Comfort with 3rd Generation Google Nest Learning Thermostat – Programmable Smart Thermostat for Alexa – Stainless Steel
$43.99
|
MISSING base and all other accessories. Scratches on the display. Also subject to change especially during peak periods. No other accessories are included. See pictures for more details.
Introducing the Google Nest Learning Thermostat
The Google Nest Learning Thermostat is a cutting-edge programmable smart thermostat designed to bring comfort and energy efficiency to your home. With its sleek stainless steel design and advanced features, this 3rd generation Nest Thermostat is a must-have for any modern household.
Key Features:
- Auto-Schedule: Say goodbye to manual programming. The Nest Learning Thermostat learns your preferences and creates a personalized schedule for you.
- Home/Away Assist: Save energy by automatically adjusting the temperature when you leave your home.
- Remote Control: Manage your thermostat from anywhere using the Nest app.
- Energy History: Keep track of your energy usage to make informed decisions and save on your utility bills.
- Nest Leaf: Easily identify energy-saving temperature settings with the Nest Leaf feature.
Product Specifications:
- Brand: Google Nest
- Model: Nest Learning Thermostat
- Color: Stainless Steel
- Temperature Control: Heating
- Connectivity: Wi-Fi
- Power Source: Battery Powered
- Item Weight: 16 ounces
- Screen Size: 2.08 Inches
- Control Type: Remote control, app control, voice control
- Compatibility: Works with Google Assistant, Amazon Alexa, and Nest
What’s Included:
- Display
- Base
- Optional trim kit
- Mounting screws and labels
- Nest screwdriver
- Installation Guide
- Welcome Guide
- Nest Pro installation card
Energy Efficiency:
The Google Nest Learning Thermostat is ENERGY STAR Certified and UL Listed, ensuring top-notch energy efficiency and performance. With its smart features and innovative design, this thermostat helps you reduce your carbon footprint while keeping your home comfortable.
Conclusion:
Upgrade your home with the Google Nest Learning Thermostat and experience the convenience of a smart, energy-efficient heating control system. With its intuitive learning capabilities and remote control access, you can enjoy personalized comfort while saving on your energy bills. Invest in the future of home heating technology with the Nest Thermostat today!
43576 reviews for Enhance Home Comfort with 3rd Generation Google Nest Learning Thermostat – Programmable Smart Thermostat for Alexa – Stainless Steel
Add a review

$43.99
Related Products

Kasa Smart Plug Ultra Mini 15A, Smart Home Wi-Fi Outlet Works with Alexa, Google Home & IFTTT, No Hub Required, UL Certified, 2.4G WiFi Only, 2 Count (Pack of 1)(EP10P2) , White

Sam Alley –
Easy to install and looks pretty sleek. I replaced a honeywell thermostat and this nest works well with the app.
Daniel Syrus –
Casí me da algo cuando no podían instalar el termostato pero cuando finalmente lo lograron de verdad que es una maravilla esta aparato, ayuda a ahorrar energía y a mantener los espacios a temperatura. Además, quién no ama poder apagarlo desde su teléfono, cuando se nos olvida apagarlo sentimos confianza de poder hacerlo de manera remota y además es extra estético.
Patrick Saysana –
Funcional y muy amable forma de vivir
Angeles quiroz –
Fast delivery and great product
David Bixler –
Updated 1/11/2022
__________________
So we’ve had 3 of these in the house for the last couple of years. I purchased it in 2018 but hadn’t installed it for months. When I finally installed the first one, it was so painless, we ran it for a few days, and it was so much easier to control than the integrated Crestron crap we had.
After a while I purchased 2 more for the other HVAC zones in the house (big house) and to my delight, my HVAC systems stopped fighting each other. Having the remote sensors really helps too, since I can use a phone or tablet, tell the thermostat which zone I’m in, and it’ll switch to that remote sensor, so I can stay warm or cold depending on where I’m spending my time in the house. The kitchen, for example, can get HOT AF when cooking, right? Bring a sensor with you into the kitchen, tell the thermostat to use that one instead of itself, and the AC/Heat will compensate. Phenomenal.
More than that.
I have paid an average of $1600 every 6 months (that’s over $3200 a year) to keep gas in my tank, and we would run out, or just about run out each time, heaters running non-stop for no reason with the old thermostats right?
I just checked. I still have 40% of my tank left…. that’s going to last me until March, April, maybe even June. That’s near a whole year! That means in 2 years, these thermostats have saved me AT LEAST $1600 in gas… for the price of 3 of these units, they’ve more than paid for themselves already. I expect them to keep working for years.
_______________________________________
There are a few setup / calibration procedures, and some notes you might want to take an interest in BEFORE you buy.
First off, this thing requires the C wire to provide power to the unit. Keep that in mind. Luckily I’m “downgrading” from a Crestron-based “smarthome” system, which luckily supplied a lot of redundant network and power options, so I have the 24v(C) wire [YAY!]. You can get someone to install them, for around $150 based on other reviews and personal experience at a previous residence.
The next thing you need to know is, it’s going to be bugged until you reboot it (based on numerous complaints/reviews/support requests). Mine was… and the simplest solution was to reboot it (in the settings on the device), then run it through its paces with the heat/cold/fan test, and then to let it run for a while. Removing it from the wall and replacing it didn’t seem to do anything. There are also some firmware updates which might help.
The next thing you need to be aware of is the placement of your sensor/thermostat wire. We determined ours was in our master bathroom. My house has 3 independent HVAC systems, powering 3 zones. Zone 1 is the Master Bath/Master Bedroom/ Study which is where our NEST Thermostat is located. If someone is in the shower, and the door is closed, the shower will remain warm from the hot water, while our bedroom will cool very quickly due to the number of windows and the deck-facing door… The thermostat said 73/74 whilst the bedroom was around 67 at one point. Once the bathroom was cooled off, the doors were opened, the temperature stabilized to an accurate reading and began heating/cooling appropriately.
If you’re not sure if your system is compatible, you can contact a NEST rep on their website for free, and they will help you examine your wiring for your current system(s) and see if your system is compatible, and will even prepare a wiring diagram to speed up the process.
Additionally: there are extra screws and far more wire connection options than you will need. You will only need 5 wires to operate the system effectively for heating and cooling. 4 if you’re only doing one or the other.
Very simple instructions, don’t overthink it.
1. Remove old thermostat / cover
2. Use included wire labels on wires (BEFORE DISCONNECTING THEM FROM OLD PANEL)
3. Remove wires from old panel.
4. Remove old patch panel.
5. Install metal adapter panel (I used the 2 screws from the old thermostat back panel/patch panel.
6. Install Shroud (you will only have 2 screw holes, so you will only need 2 of the 4 included mounting screws)
7. Pull wires through, before placing NEST patch panel on the shroud, and attach all of the wires with corresponding labels. (refer to the diagram your NEST tech provided you from their website… free)
8. Once you’ve inserted and locked all of the wires, you are ready to install the patch plate/backplate. Remove the two screws (top and bottom) holding up the shroud and install the patchplate over the backplate, without fully tightening the screws.
9. Use the integrated level to align your backplate/thermostat, then tighten the top and bottom screws.
10. Finally, install the thermostat, configure your settings, set up WiFi connection, and then run updates.
It may take some time for it to accurately read room temperature, based on thermostat location, airflow to the thermostat, and a restart of the thermostat may be required. The restart option is in the settings menu.
The app works extremely well for me, but also remember you can integrate NEST devices with IFTTT to further automate and enhance your experience. You can even use IFTTT with NEST thermostats to get alerts when they detect motion, so it doubles as a security device for my home.
MERRY CHRISTMAS!
EDIT: 12/26/2018
I purchased 2 more of these from Home Depot (don’t be mad Amazon) because, well, I wanted it done NOW. Mostly so I could properly utilize the eco/away mode. With only 1 zone in a 3 HVAC zone house on eco mode, the other 2 zones would have the burdon of normalizing the temps in the home. Instead I went all in, got 2 more thermostats for the other zones, which came with 4 temperature sensors, which paired easily and work very well it seems.
As with the thermostats, it takes a little while (20-45 minutes give or take) to start reading the right temps. The temp sensors are a great way to manage a thermostat which is in a dead air zone. If you feel too cold for the reading on the thermostat, put the temperature sensor in an area that feels cooler than the rest of the room, then tell the thermostat via the app or the wall device to use that sensor instead of its own temp reading… and badda bing badda boom you’ve got a wonderfully balanced and convenient, and elegantly climate controlled home.
It only took about 5-10 minutes for each thermostat to remove/replace the old units and install the NEST Thermostats. It’s too freaking easy.
Update Feb 5, 2019
Installed Nest thermostats throughout the house.
Dropped energy usage from 2148 kWh for Aug – September 2018 to 1834 kWh in December. All the while using the 3 HVAC systems to heat the home.
After ending up with a second Crestron thermostat dying, I had already sank over 200 bucks in replacement thermostats. So, I decided to upgrade to a smart “learning” thermostat.
There is a marked difference in how well (and evenly) the house is heated/cooled now. The HVAC systems are not active, nearly as often. Before, the thermostats (placed literally a few feet away from the HVAC intakes) would be cooled or heated by passing air, being pulled into the intakes. (Talk to the Contractor about that one) NEST allows you to use remote wireless sensors. So I placed one in the kitchen, one in the office, and one in the tiny “study” between the master bathroom and bedroom. Since then the thermostats have done a far better job at maintaining temps, using less gas, less electricity, making less noise, and doing a better job at maintaining comfortable temps.
Not to mention being able to use eco mode when I’m not home, saving more energy.
Not to mention being able to set the temperature while I’m outside, or in bed, from my phone/tablet/Alexa etc.
It’s a straightforward install too. Nest support provided a wiring diagram for free. Used the screws from the old thermostat.
There are no buttons on the units. The unit IS a button. The unit is literally a dial you turn to change options and you press it to select.
Program a schedule, or just change it. When NEST detects a pattern it “learns” and will start adjusting the thermostat before you can make it there.
Oh and you can automate with If This Then That (IFTTT.com). For instance If ( Motion Detected) Then (Turn On Lights)
Yeah NEST thermostats have motion detection so the screen stays off unless you’re close to it. Kind-of handy actually. A neat night light when I’m fumbling my way to the bathroom.
Occasionally the Living Room thermostat freaks out and goes to 55 degrees. Not sure why yet…. perhaps a firmware update is required. Not losing a star. The pros far outweight the cons here.
Breathtaking Vintage –
No doubt Google is one of the best, super easy to install and works great
Breathtaking Vintage –
I have a lot of observations to make about this product. I’ll start with what I was faced with first.
I live in a 2 story house, purchased last July. I live in South Carolina, where it’s very humid and we rarely use our heating systems. The heater with air handler is located in the attic. The house was built in 2003. No one has ever replaced the contractor-installed Bryant brand heater. I’ve had these heaters before, and they are annoying. Whenever I replaced them in the past with a Trane furnace, my bill was cut in half and none of the ridiculous traits of the Bryant happened anymore. Those being the following: Cold spots in different places all over the house. A long ignite time, which means it’s blowing cold air on you from the vents before it finally ignites. Too long to ignite. Uneven heating everywhere. Too hot upstairs, too cold downstairs. When the temps got below 35, it was unbearable downstairs unless I cranked it up to 70, which is a high temp for me on the thermostat in the winter.
My AC condenser was replaced recently, so in the summer the air conditioner handled everything very well. It is a 4 ton unit and unrelated brand to the Bryant. (not a very good plan, but at least the AC works well). The AC has none of the issues that the furnace has. It works great.
There’s a problem, though. Because past owners pieced together a different AC system, the two systems are not as efficient as they could be. They also just can’t put in a furnace and make it all work. Not the kind of efficiency furnace I’ve bought before.
I just needed a furnace, but not an AC unit. So, I set out to talk to all these Trane installers. I love the two stage AC units from Trane because they only go into the higher mode when they really have to. The answer I got?
“You can’t change out only one unit. It has to be both.” (something I knew from previous houses, anyway).
Installer: “That’s going to cost you $13,000.00”
Me: “Gulp. I know that they really need to both be married up, in order for them to work well.”
Installer: “No other way, with this pieced together system you have right now.”
The problem with this? I didn’t have the cash. Lowes would only loan me $6,000 at no interest. I always went for no interest loans in the past. Wells Fargo would only give me 5,700.00 but I could not combine both of these financing options. No one would loan me (or anyone else) that much money. I could’ve gone with a personal line of credit at my bank, but it was 10 – 12 %. Banks are a lot tighter with home improvement loans these days, since GE sold its finance division to a company called MySynchrony. GE gave me 15,000.00 no interest for the first year once. Not anymore.
So, I set out to get 4 more quotes. Same answer from all of them. So, I was stuck with running downstairs to turn the heat down at night because I felt like I was going to suffocate upstairs, then running downstairs in the morning to turn it up to get it warmer down there.
Then I remembered the Nest. It’s expensive, yes. But …..it is better to at least try to spend $248.00 instead of 13 grand.
(All the quotes I got were pretty much the same.)
At the very least, I could incorporate it into a new system in the future.
Install: Easiest install of any thermostat I’ve ever performed. I’ve always done my own installs because I liked Honeywell for many years, but there are no screws or difficult, cramped holes to put the wires into. You don’t have to read a book to figure out which wires to use and guess what kind of system you have. It already knew, once I installed it.
It’s connected to the Internet through your WIFI. If I’m upstairs with the heat on and it gets too hot up there, I just pick up my iPhone, go to the app and adjust it. If I want to go downstairs in the morning and know I have it set to 65 down there, I just heat it up a bit on my iPhone before I get out of bed.
It learns. I’m not quite sure what it will learn from me, because I’m retired and usually keep things about the same. But, the programming was extremely easy, both on the unit and on the iPhone app. Change it anytime I want.
I was at the doctor yesterday. Realized that just my dogs were at home and I had started the AC this past weekend. (You can switch between heat and air any time you want on the iPhone or iPad app…awesome. ) So, I just turned up the AC to a warmer temp because my dogs aren’t too crazy about it being really cold. Before I got home, I set it back to 70 for AC, where I like it. I was bed-ridden after some spinal injections this past weekend. I was praising this thing for making my life comfortable while I recuperated upstairs. Before, it would’ve been absolute agony to go downstairs all the time because South Carolina is in Spring already. You never know what the day will be like. I just changed it when I needed to on my iPhone.
The WIFI was easy to connect, once I realized that you turn the unit itself with a rotating dial either left or right, then press on the choice you want. No annoying methods to type in your password like it is on a Bluray player to login to an app like Netflix. Those are a pain.
The screen is motion-sensing on the unit, so you just have to walk by or wave your hand to see its settings. It seems to also get my systems to the correct temperature WAY faster than my Honeywell thermostat did. Seconds vs minutes.
Now: I’ve saved $13 Grand. For now. It’s made my furnace manageable in a two story house. I can save up the cash for a new system. It has a mode called Airwave that is supposed to save you on AC costs. I’ll know in July and August if that works well.
I believe it’s going to save me a lot of money and allow me the time to save up for the new system that I really want. I will have my installers just leave the Nest there. It’s an incredible product. I’ve not found one bug with it yet. It’s only been about 5 days, but it is already telling me it is learning.
Love this product. So glad I bought it. It’s the best piece of technology I’ve bought so far, besides the iPad Pro.
Thank you Nest. You saved me a lot of money for now.
A few months later:
This product is already saving me a lot of money. It’s already saved me $40.00 this month on electric. One thing I wanted to mention was someone was complaining about the way it displays the temperature. I think that it is just a matter of getting used to it because there is a rare occasion that the large number in the middle and the smaller number are not the same. What I’ve noticed is it gets my system up to the correct temperature way faster, and so I’m really not so concerned with the smaller number anymore.
I also saw that someone was complaining about the Away function if you don’t walk in front of it often and waking up to a cold house. I’m retired, so I don’t really need a regular Away function. I go out at really different times, so I went into the settings on the App and turned that off. Problem solved.
I love that my air conditioner doesn’t run as much as it used to, and I noticed I don’t have as much cold air coming out of the vents when the heater is working.
I also get an email of my usage each month from Nest. (see image) The leafs mean you’ve set your temp to an energy-saving setting and will also show up on the dial.
And It’s still saved me 13 grand. Win win for me.